Crafty Cardmakers challenge #261 – Lots of Layers

261 layers wmWelcome back from our Summer Break, we hope you have had a lovely Summer.

Jo is hosting today’s challenge, Lots of Layers.

As usual anything you care to enter is fine, a card, scrap layout, mixed media piece or home decor, as long as it meets the theme.

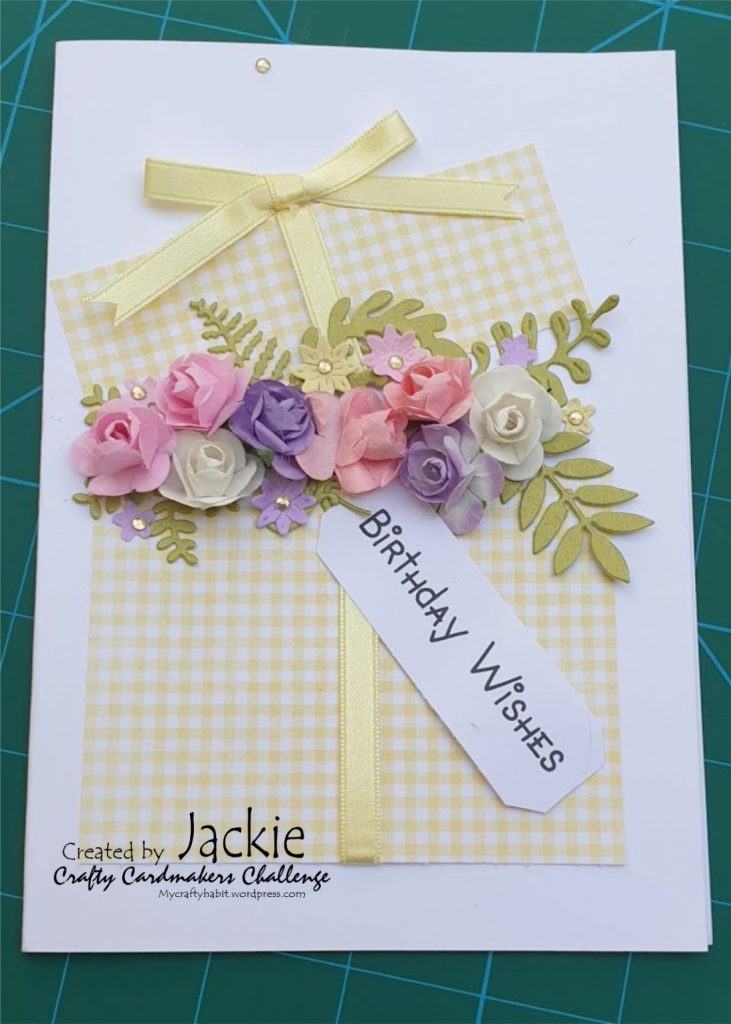
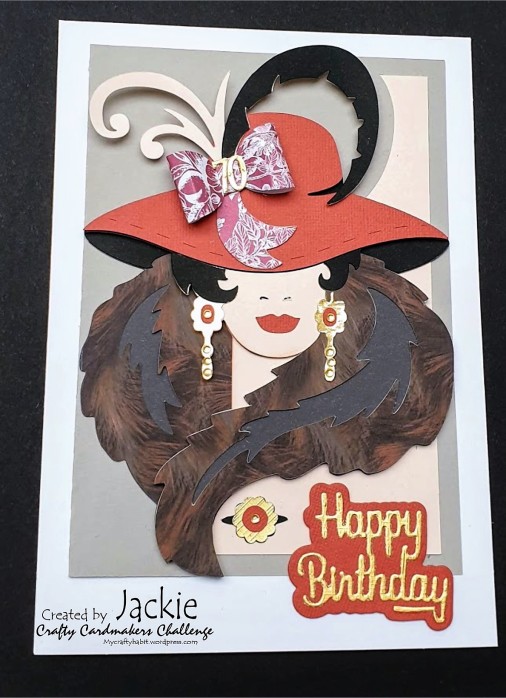
My card was made using my scan n cut machine, and some svg files that I bought from Dreaming Tree.  It came in a bundle with two other designs.  If you want to get the files, you can find them here: Le chapeau bundle

You can do an awful lot with the scan n cut machine – it is really versatile – and I don’t use it half as much as I should.  You will notice in the card that there are a lot of small pieces – and the joy of the scan n cut is that you can put your card scraps onto the mat, scan it, and then position the image you want to cut out exactly in the right place.  So no card scraps need ever be wasted…

I should add here though, that the Happy birthday sentiment and it’s mat were actually cut using a die.  You can cut sentiments like this with the machine, but they cut flat, and I like the bevel the die gives you.

Good luck with the challenge!

Crafty cardmakers challenge #260 – create your own background

I am hosting today’s challenge, Create Your Own Background
As usual anything you care to enter is fine, a card, scrap layout, mixed media piece or home decor, as long as it meets the theme.

This will be our last challenge until August 17th so the team can enjoy some time doing other things!

One of the reasons I love stamping is that it is so versatile. You can use a stamp to make embellishments, toppers, statements – and backgrounds.

For my card, I used a simple daisy stamp to create my background, with judicious use of a sticky note to create the blank space for my sentiment.

This was a super quick card – one of the reasons I chose the daisy is that you can leave the petals uncoloured (or just go over with a sparkle wash if you choose). I used my favourite 6 x 6 card base, and cut a mat out of a cheery yellow card.

(Useful tip here – the other day I was too lazy to go upstairs and get my guillotine to cut some mats, so I used an old blade in my rotary cutter and a quilters ruler to cut them. It was AMAZING. So quick and you can see the exact size you are cutting through the ruler… I used a 9.5 inch square ruler to do mine, which easily covers all the card sizes I do and it easily fits in my crafting bag. I’ve ordered another one specifically to keep there now – something like this. they come in centimetres too, if inches aren’t your thing).

Next, I took a piece of white card and stuck a sticky note in the centre. Using versafine ink, I stamped the daisy stamp over the whole of the white card before removing the sticky note.

I stamped the sentiment into the centre of the space, and then using watercolour pens I coloured in the green leaves and the yellow centres of the daisies. Done.

This is a super easy way of creating your own background paper – and had I wanted to, I could have embossed the flower centres using an embossing pen and gold embossing powder, or used a glue pen and foil.

This was just a small thing – but with a stamp, some ink and as much paper as you want, the sky is the limit!

Happy Crafting, and stay safe…

Crafty Cardmakers challenge #259 – masculine

Margaret is hosting today’s challenge, Masculine.
As usual anything you care to enter is fine, a card, scrap layout, mixed media piece or home decor, as long as it meets the theme.

For my project, I made an enhanced notebook, using a paper napkin and some texture paste. It is surprisingly effective!

I made the notebook for a friend’s husband, who uses it to record mileage done in their boat each weekend, so he can calculate diesel use, and also as a record of where they have been. The notebook as A6 in size, and just a standard lined book.

The cover was shiny – so the first thing I did was to paint it with a base of white gesso. Then I separated the napkin so that only one layer was left, and I applied it to the back book cover using napkin glue (I got mine from Anna Marie Designs). The cool part came with the front of the book – because before I put the napkin down, I applied texture paste (it’s a special paste – looks a lot like polyfilla…) under areas I wanted raised, such as the captain’s face. After gently applying the glue and with a spatula making sure the texture paste stayed in the right place, I left it overnight to dry thoroughly.

Finally, the next day I applied a top coat of varnish. Sorted. It’s a great technique, and very satisfying.

Crafty Cardmakers Challenge #258 – Wedding

Hello all, I am hosting today’s challenge, Wedding.
As usual anything you care to enter is fine, a card, scrap layout, mixed media piece, home decor, or Invites, Save the Dates etc. as long as it meets the theme.

My card was made for a friend whose daughter was getting married. She asked for the card to be “plainish” and to include a photograph of the wedding bouquet. Oh, and a copy of the apache marriage blessing…

I used the colourscheme of ivory and bronze as that fitted in with the bride’s colours, and made a gatefold card, so that I could include the other items inside the card.

On the front I stuck a diecut heart as a mat, and on top of that I put a die cut layer. I used my foilquil pen in the scan n cut to make the plaque with the couple’s names on it, and some vanilla pearl nuvo drops to decorate the opening edge. To keep the card closed, I made a card belly band out of the ivory base card and placed some ivory lace across it. In the centre of the belly band I attached a ribbon bow, using a hot glue gun.

Inside the right card flap, I created a pocket for the Apache blessing, which I printed onto the ivory base card, and cut into a tag. In the centre of the heart on the left flap, I stuck the photograph of the bouquet, with a banner sentiment.

Lastly, in the centre of the inside I put a poem and left space for my friend to write her own message. The card was quite bulky, so to keep it safe I made a box for it.

My friend was delighted with her card – so relieved!

I look forward to seeing your entries for this challenge – happy crafting!

Crafty Cardmakers challenge #257 – Butterflies

Dr. Monika is hosting today’s challenge, Butterflies.
As usual anything you care to enter is fine, a card, scrap layout, mixed media piece or home decor, as long as it meets the theme. Please make sure your butterfly/ies are a prominent part of your creation.

My card was made for a friend who passed away in March. She was a member of our craft group, and I needed to have a card to send on behalf of everyone.

I used an A5 card this time, instead of the 5 x 7 card base, which is my favourite (you would never guess, would you?) and onto that I layered some paper from a Hunkydory pad. The pad came with some die cut flowers and a bee, so I used that and the busy bee tag. The sentiment was stamped onto some more paper from the pad (matt, not foiled) andI layered it onto some plain card that I die cut.

Lily loved butterflies, so any card for her wouldn’t be complete without them. I included a couple of bees, that I stamped and coloured, because our craft group are called busy bees, and it seemed appropriate.

Crafty Cardmakers challenge #256 – Celebrations

celebrating, there is still lots to be thankful for, births, anniversaries and of course birthdays, so please join in with our challenge of Celebrations today, hosted by Kim.

As usual anything you care to enter is fine, a card, scrap layout, mixed media piece or home decor, as long as it meets the theme.

My card was made using my stash – and images I had on cds from years ago. I used the Art deco paper to make my background paper on the 7 x 5 card base. I layered the topper image onto gold mirri card, and placed that on the left hand side of the card, leaving room for the other champagne topper on the right.

Lastly, I added a die cut sentiment (Hunkydory dies, I believe).

Crafty Cardmakers challenge #255 – Anything but a card

Angela is hosting today’s challenge, Anything But a Card.

As usual anything you care to enter is fine, scrap layout, mixed media piece or home decor, as long as it meets the theme, and is not a card!

My project was a box frame memorial for a friend who lost her much loved dog at the venerable age of 15. She was lost without her, and I saw this cut file for the scan n cut and thought it may help her.

The SVG file was obtained from Opal Studios png, and the very talented designer has an Etsy shop here; https://www.etsy.com/market/opal_studios_png?ref=rlte_stm_10

The file works with any cutting machine that takes SVG files – I really would recommend that if you have such a machine, you go take a look!

Crafty Cardmakers Challenge #254 – Easter

Marlene is hosting today’s challenge, Easter.
As usual anything you care to enter is fine, a card, scrap layout, mixed media piece or home decor, as long as it meets the theme.

My card was made using an unused kit from my stash. As we are in lockdown now, I thought it would be a good time to go through it and use some of it up!

For my card I used a 7 x 5 card blank onto which I matted and layered some rectangles. I wound some gold and cream bakers twine around one of the layers, and tied it into a bow as an embellishment. One of the tags was added as a topper, with a gem to accentuate it.

I stamped a sentiment on the card blank to supplement the “Hoppy Easter” sentiment that came in the kit.

Crafty Cardmakers challenge #253 Spring

Judy is hosting today’s challenge, Spring.

With any luck Spring is springing where you are, so we would love to see your Spring creations. Spring Colours will also be acceptable.
As usual anything you care to enter is fine, a card, scrap layout, mixed media piece or home decor, as long as it meets the theme.

I am still using up my stash – and this card is a perfect way to do this. I used a plain white card blank and onto this I stuck a “box” and “lid” cut from a small piece of gingham paper. It is very easy to do simply cut the top part of a rectangle off and wrap ribbon around both parts. Stick it down so the side of the “lid” is angled up. Attach the bow to the top and last touch, add the label with the sentiment on it to the box base.

Then, it is simply a matter of sticking in flowers and leaves of your choice.

These are very difficult times for everyone, all over the world, and I think as crafters we are luckier than most people who are self isolating, or practising social distancing, because we have something to do to pass the time.

I also sew, and I am currently finishing up my UFOs and tinkering with new projects while I stay indoors, because it is vitally important that we all do this, to stay safe and help the NHS.

Every trip outside increases the possibility of spreading this dreadful virus, so please, wherever you can, stay indoors, stay safe – and keep Crafting!

Crafty Cardmakers challenge #251 Embossing


Josephine is hosting today’s challenge, Embossing. This can be either dry embossing using a tool or a folder, or embossing a stamp, etc.

As usual anything you care to enter is fine, a card, scrap layout, mixed media piece or home decor, as long as it meets the theme.

My card was a sympathy card – 2020 hasn’t been a good year – and was made using a plain white base card (7×5) onto which I layered a black mat. I used some grey marble card stock for my next layer, which I ran through my machine in an embossing folder to get the lattice effect. My topper layer was plain black card, layered with more of the marble card, and a top layer of a die cut frame.

The sentiment was stamped in the centre of the frame.